02 Using DB Browser for SQLite
Overview
Teaching: 30 min
Exercises: 0 minQuestions
What does the DB Browser for SQLite allow me to do?
Objectives
Understand the layout of the DB Browser for SQLite and the key facilities that it provides
Connect to databases
Create new databases and tables
Launching DB Browser
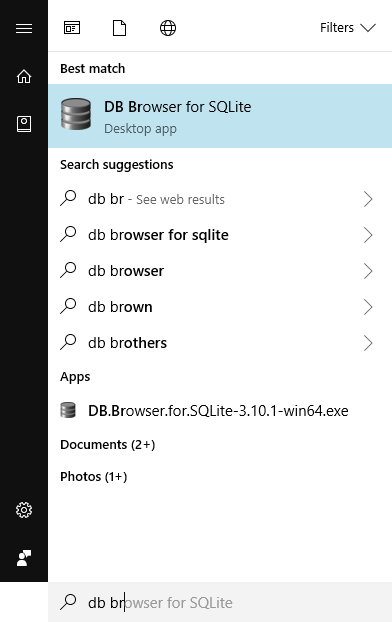
In Windows the installation of DB Browser does not create a desktop icon. To explicitly launch the application after installing it, use the windows button (bottom left of screen) and type in ‘DB Browser’ in the search bar and selecting the application when it appears.
The Initial screen
The initial screen of DB Browser will look something like this, the panes may be in a different configuration;

There is;
A small menu system consisting of File, Edit, View and Help. Below the menu system is a toolbar with four options; New Database, Open Database, Write Changes and Revert Changes. Below the toolbar is a 4-tabbed pane for; Database Structure, Browse Data, Edit Pragmas and Execute SQL. Initially these will be quite empty as we haven’t created or opened a database yet. In general we will see how each of these are used as we go through the lesson with the exception of the Edit Pragmas tab which deals with system wide parameters which we won’t want to change.
On the right hand side there are two further panes, at the top is the Edit Database Cell pane which is grayed out. Below it is a 3-tabbed pane for DB Schema, SQL log and Remote. We are only really interested in the DB Schema tab.
Initial changes to the layout.
The overall layout of DB Browser is quite flexible. The panes on the right-hand side can be dragged and dropped into any position, the individual tabs on the bottom pane closed directly from the pane and re-opened from the menu View item.
We will make a couple of initial changes to the layout of the screen. These will be retained across sessions.
- From the View menu item un-select the ‘Edit Database Cell’ icon to the left of the text. This will make the pane close and the bottom pane will be expanded automatically to fill the space.
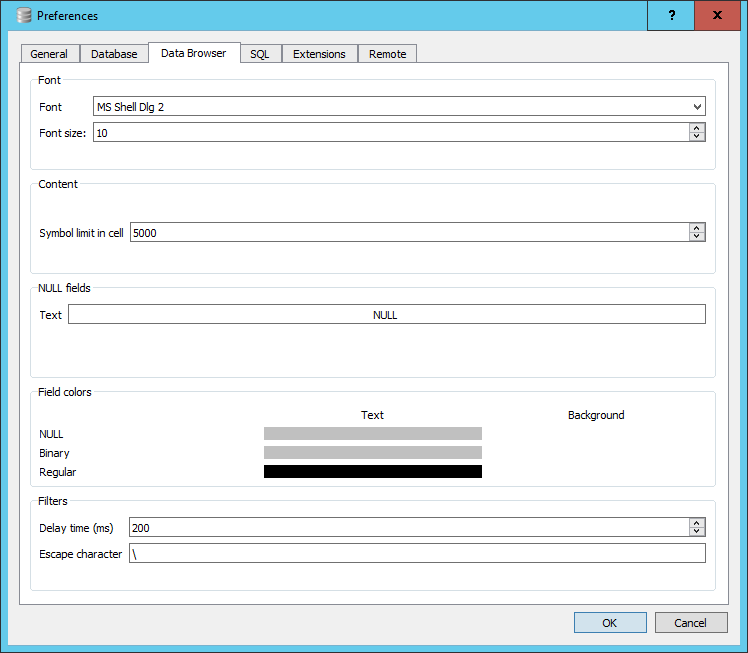
- a) On Windows, From the View menu item select ‘preferences’ and select the Data Browser tab.
- b) On Mac, From the “DB Browser for SQLite” menu item select ‘preferences’ and select the Data Browser tab.
-
Check the Font box has a font selected - if it doesn’t choose one - e.g. Arial
-
Towards the bottom there is a section dealing with Field colors. You will see three bars below the word Text, to the right there are in fact three invisible bars for the Background. Click in the area for the Background color for NULL. A colour selector window will open, select Red. The bar will turn Red. This is now the default background cell colour that will be used to display NULL values in you tables. We will discuss the meaning of NULL values in a table in a later episode.
You can now close the preference window by clicking OK.
Opening a database
Let’s look at a pre-existing database, the SQL_SAFI.sqlite file from the SAFI project that you downloaded during the setup.
To open the database in DB Browser do the following;
- Click on the ‘Open Database’ button in the toolbar.
- Navigate to where you have stored the database file on your local machine, select it and click ‘Open’.
You can see the tables in the database by looking at the left hand side of the screen under the ‘Database Structure’ tab. Here you will see a list under ‘Tables’. To see the contents of any table , click on it, and then click the ‘Browse Data’ next to the ‘Database Structure’. This will give us a view that we are used to - a copy of the table. Hopefully this helps to show that a database is, in some sense, just a collection of tables, where there’s some value in the tables that allows them to be connected to each other (the ‘related’ part of the ‘relational database’). Also note there are options for ‘New Record’ and ‘Delete Record’. As our interest is in analysing existing data not creating or deleting data, it is unlikely that you will want to use these options.
The ‘Database Structure’ tab also provides some metadata about each table. If you click on the down arrow next to a table name, you will see information about the columns, which in databases are referred to as ‘fields’, and their assigned data types (the rows of a database table are called records). Each field contains one variety or type of data, often numbers or text. You can see in the Plots table that most fields contain numbers (INTEGER, REAL, or floating point numbers/decimals and TEXT) while the Crops table is mostly made up of INTEGER fields.
The “Execute SQL” tab is where we’ll be typing our queries to retrieve information from the database tables.
A Note About Data Types
The main data types that are used in SAFI database are INTEGER and TEXT which define what value the table column can hold.
SQL Data Type Quick Reference
Different database software/platforms have different names and sometimes different definitions of data types, so you’ll need to understand the data types for any platform you are using. The following table explains some of the common data types and how they are represented in SQLite; more details available on the SQLite website.
| Data type | Details | Name in SQLite |
|---|---|---|
| boolean or binary | this variable type is often used to represent variables that can only have two values: yes or no, true or false. | doesn’t exist - need to use integer data type and values of 0 or 1. |
| integer | sometimes called whole numbers or counting numbers. Can be 1,2,3, etc., as well as 0 and negative whole numbers: -1,-2,-3, etc. | INTEGER |
| float, real, or double | a decimal number or a floating point value. The largest possible size of the number may be specified. | REAL |
| text or string | and combination of numbers, letters, symbols. Platforms may have different data types: one for variables with a set number of characters - e.g., a zip code or postal code, and one for variables with an open number of characters, e.g., an address or description variable. | TEXT |
| date or datetime | depending on the platform, may represent the date and time or the number of days since a specified date. This field often has a specified format, e.g., YYYY-MM-DD | doesn’t exist - need to use built-in date and time functions and store dates in real, integer, or text formats. See Section 2.2 of SQLite documentation for more details. |
| blob | a Binary Large OBject can store a large amount of data, documents, audio or video files. | BLOB |
How does the database represent missing data?
All relational database systems have the concept of a NULL value. NULL can be thought of as being of all data types or of no data type at all. It represents something which is simply not known.
When you create a database table, for each column you are allowed to indicate whether or not it can contain the NULL value. Like primary keys, this can be used as a form of data validation.
In many real life situations you will have to accept that the data isn’t perfect and will have to allow for NULL or missing values in your table.
In DB Browser we can indicate how we want NULL values to be displayed. We will use a RED background to the cell to make it stand out. In SQL queries you can specifically test for NULL values.
We will look at missing data in more detail in a later episode.
To summarize:
- Relational databases store data in tables with fields (columns) and records (rows)
- Data in tables has types, and all values in a field have the same type (list of data types)
- Queries let us look up data or make calculations based on columns
Database Design
Database design involves a model or plan developed to determine how the data is stored, organized and manipulated. The design addresses what data will be stored, how they will be classified, and the interrelationships between the data across different tables in the database.
- Every row-column combination contains a single atomic value, i.e., not containing parts we might want to work with separately.
- One field per type of information
- No redundant information
- Split into separate tables with one table per class of information
- Needs an identifier in common between tables – shared column - to reconnect (known as a foreign key).
Terminology
In the Introduction to SQL lesson, we introduced the terms “fields”, “records”, and “values”. These terms are commonly used in databases while the “columns”, “rows”, and “cells” terms are more common in spreadsheets. Fields store a single kind of information (text, integers, etc.) related to one topic (country, interview date, province), while records are a set of fields containing specific values related to one item in your database (a farm, a plot, a crop).
To design a database, we must first decide what kinds of things we want to represent as tables. A table is the physical manifestation of a kind of “entity”. An entity is the conceptual representation of the thing we want to store informtation about in the database, with each row containing information about one entity. An entity has “attributes” that describe it, represented as fields. For example, a farm or a plot is an entity. Attributes would be things like the Country, or province which would appear as fields.
To create relationships between tables later on, it is good to designate one column as a primary key. A primary key, often designated as PK, is one attribute of an entity that distinguishes it from the other entities (or records) in your table. The primary key must be unique for each row for this to work. A common way to create a primary key in a table is to make an ‘id’ field that contains an auto-generated integer that increases by 1 for each new record. This will ensure that your primary key is unique.
For example if you had a table of car information, then the “Reg_No” column could be made the primary key as it can be used to uniquely identify a particular row in the table. Take a look at the Farms table - what do you think the primary key here qwould be?
A table doesn’t have to have a primary key although they are recommended for larger tables. A primary key can also be made up of more than one column, although this is less usual.
What different types of keys are there?
In addition to the primary key, a table may have one or more Foreign keys. A foreign key does not have to be unique or identified as a foreign key when the table is created. A foreign key in one table will relate to the primary key in another table. This allows a relationship to be created between the two tables. If a table needs to be related to several other tables, then there will be a foreign key (column) for each of those tables.
Import
Before we get started with writing our own queries, we’ll create our own database - something many of you are likely to need to do. We’ll be creating our database from the three csv files we downloaded earlier.
plots
- Contains plot information.
- (9 fields, 1044 records)
- Field names:
Id,plot_Id,D01_curr_plot,D02_total_plot,D03_unit_land,D03_unit_land_other,D04_crops_harvsted,D04_crops_harvsted_other,D_crops_count
crops
- Contains various crops and associated plot information. The table also associates crops referenced in the ‘crops’ table by the
crop_Idfield. - (6 fields, 844 records)
- Field names:
Id,plot_Id,crop_Id,D05_times,D_curr_crop,D_repeat_times_count
farms
- Contains individual farm survey information
- (61 fields, 350 records)
- Field names:
id,Country,A01_interview_date,A03_quest_no,A04_start,A05_end,A06_province,A07_district,A08_ward,A09_village,A11_years_farm,A12_agr_assoc,B_no_membrs,B_members_count,B11_remittance_money,B16_years_liv,B17_parents_liv,B18_sp_parents_liv,B19_grand_liv,B20_sp_grand_liv,C01_respondent_roof_type,C02_respondent_wall_type,C03_respondent_floor_type,C04_window_type,C05_buildings_in_compound,C06_rooms,C07_other_buildings,D_no_plots,D_plots_count,E01_water_use,E_no_group_count,E_yes_group_count,E17_no_enough_water,E18_months_no_water,E19_period_use,E20_exper_other,E21_other_meth,E22_res_change,E23_memb_assoc,E24_resp_assoc,E25_fees_water,E26_affect_conflicts,F04_need_money,F05_money_source,F05_money_source_other,F08_emply_lab,F09_du_labour,F10_liv_owned,F10_liv_owned_other,F_liv_count,F12_poultry,F13_du_look_aftr_cows,F14_items_owned,G01_no_meals,G02_months_lack_food,G03_no_food_mitigation,gps:Latitude,gps:Longitude,gps:Altitude,gps:Accuracy,instanceID
Close the currently open database (File > Close Database) and then follow these instructions:
- Start a New Database
- Click the New Database button
- Give a name and click Save to create the database in the opened folder
- In the “Edit table definition” window that pops up, click cancel as we will be importing tables, not creating them from scratch
- Select File » Import » Table from CSV file…
- Choose the
SAFI_plots.csvwe downloaded and click Open. - Give the table a name (
Plots), or use the default - If the first row has column headings, be sure to check the box next to “Column names in first line”.
- Check the field separator and quotation options are correct. If you’re not sure which options are correct, test some of the options until the preview at the bottom of the window looks right.
- Press OK, you should subsequently get a message that the table was imported.
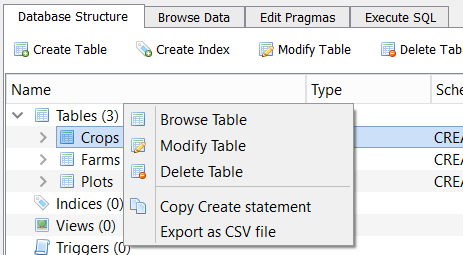
- Back on the Database Structure tab, you should now see the table listed. Right click on the table name and choose Modify Table, or click on the Modify Table button just under the tabs and above the table list.
- Click Save if asked to save all pending changes.
- In the center panel of the window that appears, set the data types for each field using the suggestions in the table.
- Finally, click OK one more time to confirm the operation. Then click the Write Changes button to save the database.
- Repeat this process to import the
SAFI_cropsandSAFI_farmstables (with the table namesCropsandFarms)
You can also use this same approach to append new fields to an existing table.
NOTE: If at this point you have any issues you can close this database, open the original SQL_SAFI.sqlite file from earlier in this episode and continue.
Adding fields to existing tables
- Go to the “Database Structure” tab, right click on the table you’d like to add data to, and choose Modify Table, or click on the Modify Table just under the tabs and above the table.
- Click the Add Field button to add a new field and assign it a data type.
SQL Data Type Quick Reference
Different databases offer different choices for the data type definition.
The following table shows some of the common names of data types between the various database platforms:
| Data type | Access | SQLServer | Oracle | MySQL | PostgreSQL |
|---|---|---|---|---|---|
| boolean | Yes/No | Bit | Byte | N/A | Boolean |
| integer | Number (integer) | Int | Number | Int / Integer | Int / Integer |
| float | Number (single) | Float / Real | Number | Float | Numeric |
| currency | Currency | Money | N/A | N/A | Money |
| string (fixed) | N/A | Char | Char | Char | Char |
| string (variable) | Text (<256) / Memo (65k+) | Varchar | Varchar2 | Varchar | Varchar |
| binary object OLE Object Memo Binary (fixed up to 8K) | Varbinary (<8K) | Image (<2GB) Long | Raw Blob | Text Binary | Varbinary |
Key Points
The DB Browser for SQLite application allows you to connect to an existing database or create a new database